
The Ultimate Guide to Making Jerky


Have you ever wondered how to make jerky at home? Jerky is one of the oldest forms of food preservation, dating back to the 1500s when the Incans stored and preserved llama and other game by drying meat strips for hours in the sun (the name comes from the Incan "ch'arki," which literally translates to "dried meat"). Jerky also became popular with settlers in the American West that would often eat beef jerky, as it was easy to carry and lasted through long treks. Jerky making has come a long way in the last few centuries, with several different methods, tools, and varieties available. And it's so easy, you can learn how to make beef jerky, venison jerky and more at home with little to no special equipment required. For an even easier start, try one of our all-in-one jerky making kits, complete with everything you need to create delicious, homemade jerky. So how do you make jerky? Let our professional chefs and jerky experts guide you.

Whole Muscle vs Ground Jerky Technique
When you think of jerky, you instantly think of the savory leather pieces of beef jerky you tear off with your teeth with a bit of chew. That tough, chewy quality is achieved from slicing the whole muscle fibers with the grain. If you want a quicker method, ground beef jerky (also called formed or restructured jerky) requires no marinating time but results in a chewier, snack-stick like texture.
Jerky Making Tools
Meat Slicer (Whole): Yes, you can easily make beef jerky with a knife. But if you're making large quantities of jerky often, it's time to invest in a quality meat slicer. This will ensure that your slices are even thickness to allow for more consistent drying results.
Jerky Gun (Ground): For uniform pieces, using a jerky gun is your best bet. Simple load and press your seasoned ground meat onto your metal rack or trays. Most jerky guns on the market come with multiple attachments so you can make flat strips or round sticks. . For a bold, flavorful twist, try our No. 488 Jamaican Jerk Snack Stick Seasoning—perfect for spicing up your homemade jerky with authentic island flavor.
Rolling Pin (Ground): No jerky gun? No problem. Place a portion of your ground meat between two pieces of plastic wrap or wax paper and roll into ¼" thick. Slice and carefully transfer to your wire rack.
Wire Racks (For Oven or Smoker): Wire wracks are a must for both ground and whole jerky making. However, if you're planning on making jerky in the oven, you can place your jerky slices on metal skewers and hang them down through the top of an oven rack. Place a cookie sheet on the bottom rack to catch the drippings.
Smoker, Dehydrator, Oven or Air Fryer If you're ready to start making jerky at home, check out our full collection of jerky making kits for everything you need in one convenient package: Shop All Jerky Kits.
Choosing Your Meat for Jerky
Jerky can be made from virtually any lean cut of meat. Make sure to trim any visible silver skin or fat from the meat as it will prevent your jerky from drying and increase the chances of it turning rancid. And fresh is best: buy your meat right before making jerky. Generally, 3 lbs of raw jerky meat will produce 1 lb of dry jerky. Each PS Jerky Kit is measured for 5 lbs of meat, so expect around 2 lbs of dry jerky.
- Beef: Flank, eye of round, top round, bottom round, sirloin tip roast
- Poultry: Tenderloin, breasts
- Pork: Tenderloin
- Venison: Eye of round, rump roast, backstrap
- Fish: Tuna steaks, Salmon (skin and fat removed)
- Ground: Lean, but nothing more than 10% fat
As you might expect, beef jerky is the most popular meat for jerky making but other meats can be just as, if not more, delicious. We have a great venison jerky recipe as well if you're up for something wilder! If you're looking to spice things up, we also have a blog featuring our top venison seasonings – perfect for crafting bold, flavorful venison jerky at home.
Jerky Cure and Seasoning
Once you've chosen your meat, it's time to get your creative juices flowing and mix up your jerky marinade. The best jerky flavors are salty, sweet and spicy but can be as simple as just salt, pepper and garlic (try our recipe for a DIY Jerky Brine). Nothing is off the table when it comes to jerky marinades, so you can try a variety of dry seasonings and spices or or liquids like soy sauce, bourbon, etc. If you want to experiment with flavor, our complete Jerky Kits come with our award-winning seasoning blends and cure for up to 15 lbs of jerky meat.
Is a cure necessary when making jerky?
For safety, yes. Using a jerky cure will inhibit bacteria growth and prevent botulism or other foodborne illnesses, as jerky is dried at low temps, not cooked. Cured jerky will also lengthen the shelf-life of your product. Without the proper curing salt for jerky, your meat strips will last about 2 weeks or less.
How long to marinate jerky
If using a jerky cure and seasoning, it's very important that you marinate your meat for at least 8 hours.
Whole Muscle Method
Visit our step-by-step tutorial (with pictures) here.
- Make sure to remove all fat and silverskin from the meat (your jerky shouldn't floss your teeth).
- Partially freeze meat for 1.5-2 hours for easy slicing.
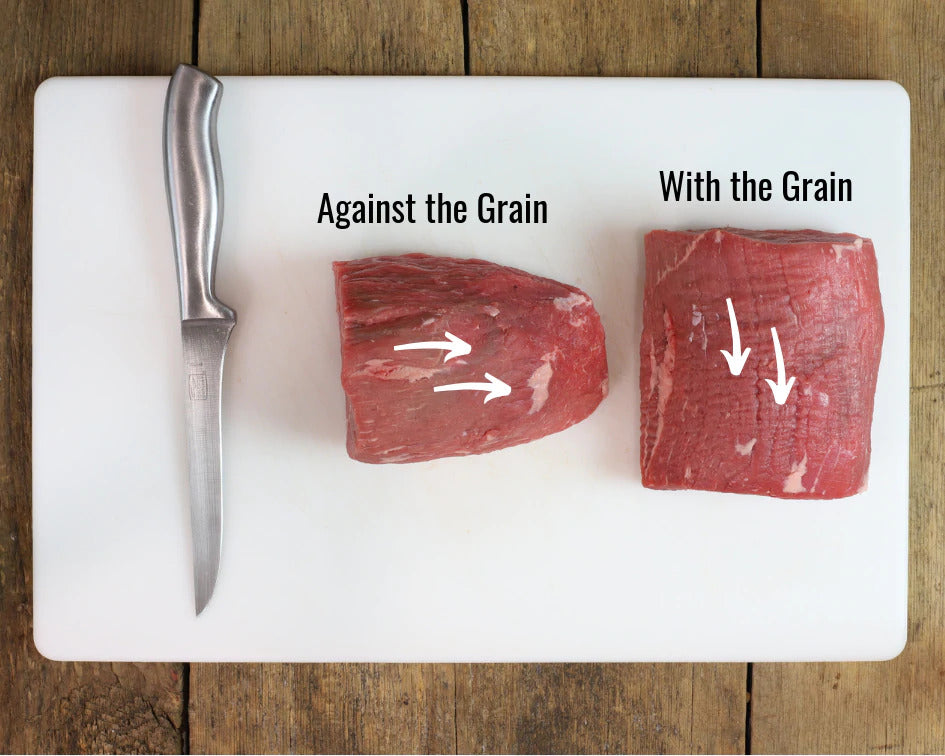
-
Slice against the grain for tender jerky, with the grain for traditional chewier texture, and around ¼" thick. Any thinner, it'll be too dry and any thicker you will have problems drying it and preserving it as it will hold too much moisture.
- Mix contents of one Seasoning and Cure jerky making packet with 1 cup of water and add the 5 lbs of sliced meat. Marinate 8-24 hours in a plastic storage bag. The longer the meat for jerky marinates, the better the flavor. Stir or squish meat around every few hours to ensure it's evenly coated
Ground or Formed Method
- Mix contents of one Jerky Seasoning and Cure* packet with 5 lbs lean, ground meat and 1/2 cup cold water. Mix until sticky and the color is uniform throughout, without any streaks. This ensures that the cure is evenly distributed.
- Jerky Gun: Fill jerky gun with ground mixture and shoot strips 1/4" apart onto a wire rack or dehydrator tray.
- Rolling Pin: Place a small portion of seasoned meat between two sheets of wax paper. Roll the meat until it's about 1/4" thick. Remove the top piece of wax paper and cut meat into strips using a knife or pizza cutter. Gently lay pieces on wire racks or dehydrator trays.
Note: When using ground meat for jerky making, letting the meat marinate with the cure and seasoning mix overnight may change the texture of the meat. Due to the acidity of some seasoning ingredients, they may stiffen the meat, making it difficult to load into your jerky gun.
Drying Your Jerky
Smoker:
This is our favorite method for drying jerky (but maybe we're biased). Depending on your smoker, you may have to experiment with temp settings and times the first few times to get it just right. However, the delicious smoke flavor and tenderness that comes with making beef jerky in a smoker just can't be beaten. Note that jerky drying times can vary between 4- 8 hours based on your smokehouse.
1. Preheat the smokehouse to 140°F before loading. Follow the instructions below.
| Stage 1 | 1 Hour | 140°F | Smoke Off | Damper Closed |
| Stage 2 | 1 Hour | 150°F | Smoke On | Damper Open |
| Stage 3 | *** | 160°F | Smoke Off | Damper Open |
*** Until jerky shrinks 50% by weight or until done.
*NOTE: These instructions are meant as a general guideline. Refer to and follow instructions of your brand smoker.

Oven:
Drying your jerky in the oven is the easiest choice for those who don't want to invest in any additional equipment. Making jerky in the oven also speeds up the drying process--expect 2-3 hours in an oven and 4-6 in the dehydrator. You can even follow our step-by-step blog on How To Make Beef Jerky with No Equipment
- Set oven temp to 180°F. Place loaded wire racks on cookie sheets, place in the oven
- Prop the oven door open about 1" for the first hour to improve ventilation & reduce drying time.
- Bake for 1 hour, then turn strips over. Turn every 30 minutes until done.
Dehydrator:
Meat dehydrators are the ultimate convenience when it comes to jerky making. With controlled temps and automatic shut-offs, you're able to get a more consistent piece of jerky. So how long to dehydrate jerky? Here's the jerky drying process:
- Load full racks into the dehydrator. Completely load unit before turning on.
- Dry the jerky at 160°F for 4 to 6 hours.
- Rotate racks throughout the drying process and blot the surface of the jerky occasionally until dry.
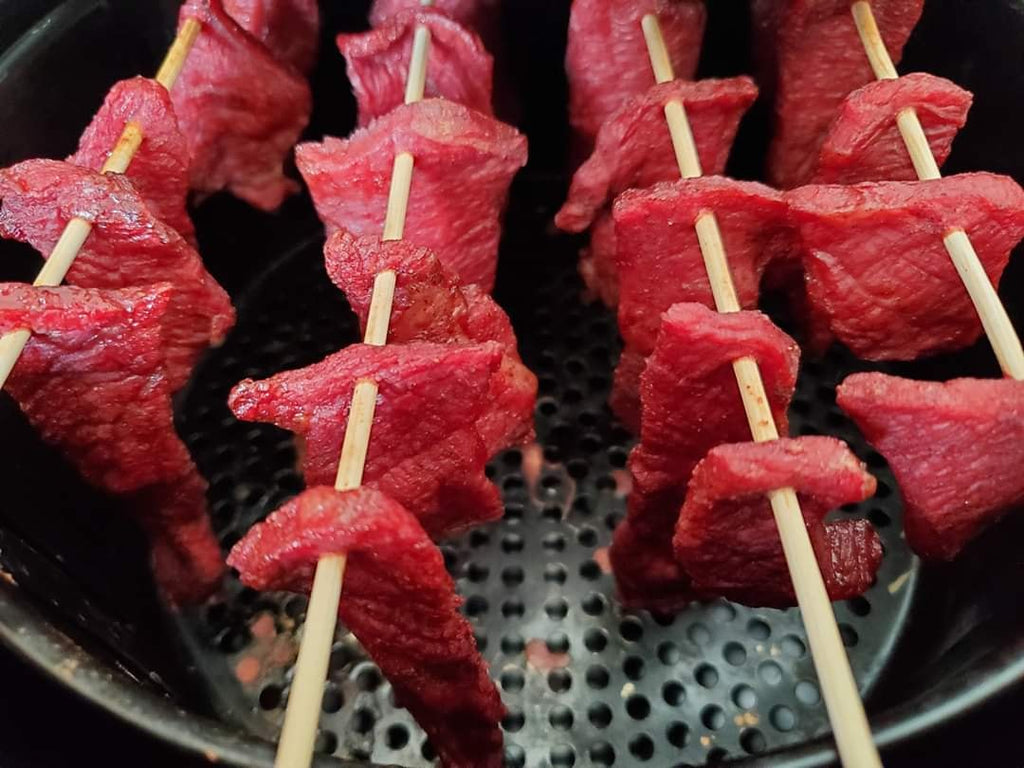
Air Fryer:
If you have an Air Fryer at home, you can use it to make homemade beef jerky in a fraction of the time. An air fryer is a supercharged convection oven with a compact space that facilitates faster cooking. Hot air rushes down and around food placed in a fryer-style basket. This rapid circulation makes the food crisp, much like deep frying. The hot air circulation works similarly to oven drying when set at a low temp, the only downside is that the amount of jerky you can make at one time is limited.
- Remove the jerky pieces from the marinade and blot dry with paper towels to remove as much moisture as possible.
- To ensure your jerky doesn't overlap, use wooden skewers trimmed to fit the length of your air fryer to hang your jerky pieces. Hang just inside the basket lip.
- Set Air Fryer to 180° F and let cook for one hour.
- Allow to cool, dab with paper towels to remove excess oil from the jerky.
Storing Your Jerky
And for the final step: how to store homemade beef jerky. Properly dried jerky should be firm, not crisp. Good jerky will break and crack, but not snap when bent. Make sure jerky is completely cool and dried before storing, and store in a dark, dry place, between 50-60 degrees F. If moisture droplets appear on the inside of the storage container, the jerky should be dried further. Avoid storage in plastic containers or bags, as they can tear--we recommend tall glass storage jars.

